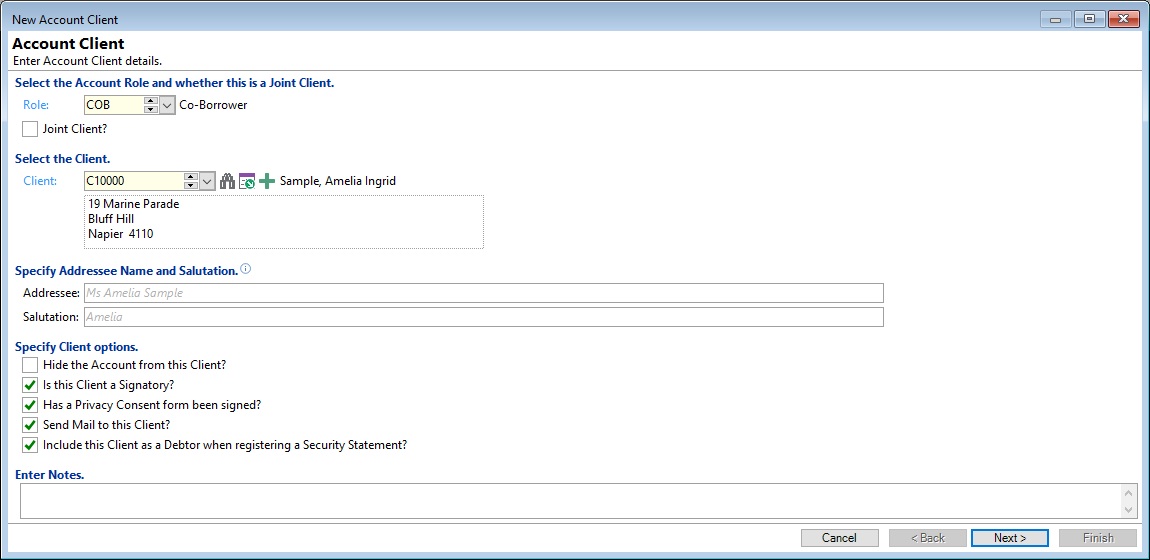
When you click on the 'drilldown'  icon, the screen of the wizard will pop up.
This additional option allows you to amend some of the settings for the Client on the Account, for example, change the type of 'Salutation' used.

Select the Account Role and whether this is a Joint Client
- Role - select the Account Role for the Client.
Account Roles define the role that Clients perform on an Account and show whether that Client is the Owner of the Debt, Owner of the Investment, Guaranteeing it for someone else or involved in the Account in a secondary role and not necessarily liable for the funds.
- Joint Client - tick the checkbox if this is a Joint Client. The option will only be enabled if the Role selected is not a Main Borrower.
Select the Client
If a Client has been selected, this field will display the Client Code, Name and Address details.
If there is no Client showing, then use the dropdown list to select a Client.
| Icon | Description |
|---|---|
 | Opens the Client Search or Client List, depending on the option selected in User Preferences. |
 | Opens the selected Client form. |
 | Add a new Client if no relevant records exist. |
Specify Address name and Salutation
If left blank then the Addressee Name and Salutation specified on the Client will be used. These can be viewed within the fields as greyed out text.
If this is the first Client of one or more Joint Clients, then you can enter a custom Addressee Name, e.g. Mr and Mrs Smith.
- Addressee - enter the name as it is to appear in the address.
- Salutation - enter the name as it should appear at the top of any correspondence.
Specify Client options
Tick the following checkboxes where relevant to the Client on the Account:
- Hide the Account from this Client - leave this un-ticked if you want the Account to show in the list of Accounts on the Client form.
- Is this Client a Signatory - tick where the Client is a signatory on the Account.
- Has a Privacy Consent form been signed - tick to show that the Client has signed a Privacy Consent form.
- Send Mail to this Client - tick so that the Client will receive mail relating to this Account. This is especially important for Clients who must receive notification in cases of default, e.g. Overdue Letters.
- Include this Client as a Debtor when requiring a Security Statement - tick so that the Client is recorded on the Security Statement.
Enter Notes
Enter any Notes that are required.
If you are entering Insurance details for the Client, you need to click the  button.